Thursday, February 24, 2011

TUTORIAL: Monster Backpack

Rar!  This monster backpack will keep any fiend away from your crayons and coloring books.  Lincoln needed a new backpack for his birthday, and as luck would have it, MADE featured a fantastic boy-themed etsy roundup, including a Monsterpak from this fun etsy shop.  Inspiration was born!

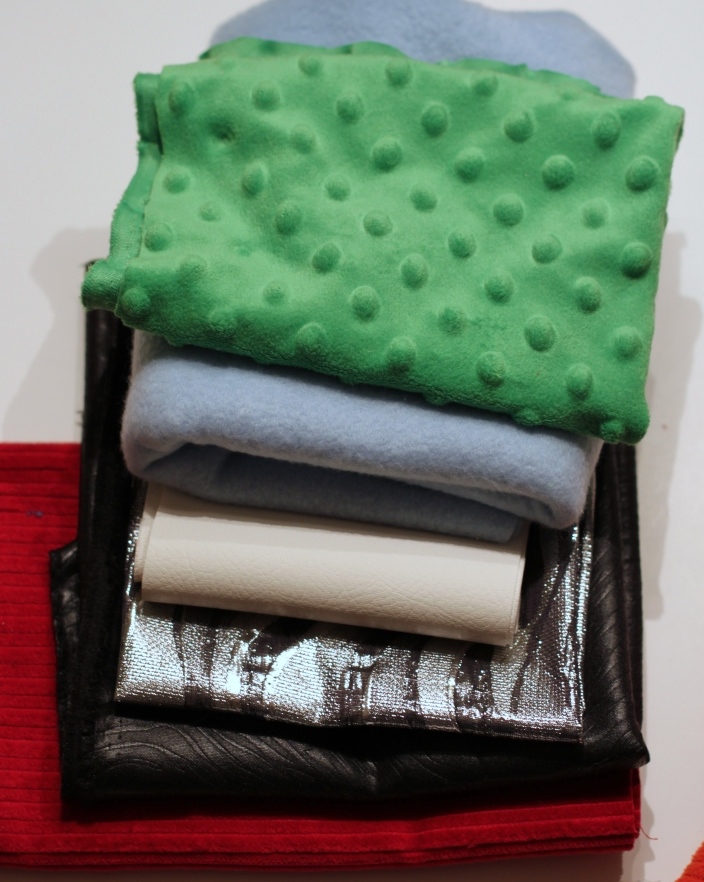
For this project, grab your stash of scrap fabric...

and a backpack with a fairly plain front.  Lincoln's favorite color is green, so this pack was an easy choice.

If you're adding horns to your monster, you'll also need batting/stuffing.

Remove any labels.

Now you're ready to embellish your monster's face however you wish.

I started with teeth.  I found white vinyl upholstery fabric at my local JoAnns.  I'm not sure why anyone would want vinyl upholstery, but the fabric is sturdy, doesn't fray, and seems perfect for making monster teeth.  A bought a six-inch cut, which probably makes for a lifetime supply of crafty critter projects.

Be sure to steer clear of the zipper.

Stitch in place.

Chomp, chomp.

Continue embellishing however you wish.  To help me decide what size and shape I wanted my tongue and eyes, I set a piece of scratch paper on top of the backpack and doodled until I got a shape and size I liked.  My sketch then became my pattern for cutting each piece.

I sewed the tongue in place.  Fortunately the front pocket on Lincoln's backpack is big and my machine is extremely maneuverable, so I could applique the tongue using my Bernina.  I don't think my old Singer could have handled this however, so don't be surprised if you have to applique some parts by hand.

TIP: When you're working with layered pieces, such as eyes, sew from the top layer down.  For example...

sew the black pupil to the white eyeball...

then sew the white fabric to the blue fabric...

then sew the blue fabric onto the backpack.  See how I never had to sew through more than two layers of fabric?  That's much easier than sewing each layer onto the backpack.

TIP: If you're adding eyebrows, faux fur has nap, meaning that if you look at the fabric, the fur points in a certain direction. Make sure you line up your pattern pieces such that when you cut your right eyebrow, the fur points to the right. Then flip over the pattern so that when you cut your left eyebrow, the fur points left.  Warning: When you cut faux fur, be prepared for a flurry of scrap fur to cover your workspace. Try to only cut the fabric backing, not the fur itself. Still, arm yourself with a Swiffer or a vacuum cleaner. You'll need it.

Stitch in place.  Push the fur aside so that you're only stitching the fabric backing.

To make the horns, I wrapped my fabric around a styrofoam cone and pinned the fabric in place.  I'm sure there are cone patterns online you could use, but since I happened to have a cone, it was faster to use it rather than hunt for a template.  It also helped that my cone was still in its plastic wrapper, so I didn't get styrofoam bits on my fabric.  TIP: If you use a cone to shape your fabric, remember to pin your fabric with right sides together.  The right side of your fabric will face the cone; the wrong side of the fabric will face towards the outside.

Stitch your cone, turn, and stuff with batting/stuffing.

The styrofoam cone was taller than I wanted my horn, so I left the bottom few inches of my fabric cone unfilled.  I gathered the extra fabric and tied the threads to form the bottom of my horn.

Pin the horn to your backpack and hand stitch in place.

You're done!  Congratulations on making your own monster backpack!

Wednesday, February 16, 2011

Doll Pants: A (non)Tutorial

Remember this little beauty?  I made her clothes without a pattern.  I'm back to give a little how-to, at least for the pants.  It's not a full tutorial, but maybe it will help someone out there in Blogland.

 I started with my naked doll.

Using the body as a guide, I sketched what I thought a pattern might look like.  This was mainly to help me with the length of the pants and the distance from the waist to the crotch.  I wanted my doll to have fairly tight fitting leggings, so I didn't make my pants too wide.  If you look at the photo...

and at the finished sketch (which is REALLY blurry - so sorry!) you'll see where I added length for the hem of the pant leg and for encasing the elastic waistband.  My finished doll was approximately 15" tall.  You can see by how much computer paper I used that the total length of the fabric I needed was approximately 11".

Using my sketch as a guide, I redrew the pattern so that the left and right sides were symmetrical, lines were straight, etc.  Then I cut two identical pieces of fabric for the front and back of the doll pants.

With right sides together, I pinned the inner leg seams...

and sewed them on my machine.  As with all pants, I reinforced the seam around the crotch.  I'm not sure this is necessary for doll clothing, but it's habit.

Then I hemmed the pant legs.  Yes, I know this step is different than traditional pants. Normally when making a pair of pants, you'd sew all of the side seams first and hem the pant legs last.  But for a doll, the leg openings are so small that if you waited to hem at the end, the leg hole would be too small to fit on your machine.  I have a picture father down that will help this will make sense.

 I pinned and sewed the side seams.

TIP: Start sewing at the bottom (hem) of the pant leg and sew towards the top.  This ensures that the hem is even.  The top of the fabric will become the casing for the elastic waistband, so if the two pieces of fabric do not line up exactly, no one will ever know.

See what I mean about a small opening for the leg hole?  Imagine trying to hem in an opening that small.  It would NOT be easy getting that around your presser foot.

Now turn down the top of the pants to make the casing for the elastic waistband.  Remember to leave a hole to insert the elastic.  Insert the elastic, then sew hole closed.  Voila!  Done.

For the tunic, I also made my own pattern.  Unfortunately I didn't take many pictures.  I'll try to describe what I did, but I realize it's hard to follow along without photos.

First, I sketched out what I wanted my finished tunic to look like, then mentally broke apart the pattern to see what pieces of fabric I'd need.  Here I have the front and back of a body, plus two sleeves.  I sewed both sides of each sleeve to the front and back body pieces of the tunic.  (Front of each sleeve to the front of the tunic, back of each sleeve to the back of the tunic.)  Then I hemmed the ends of the sleeves.  As with the leg holes on the pants, I knew the arm holes would be too small to maneuver around a presser foot after the side seams on the sleeves had been sewn together.

With the sleeves hemmed, I sewed the sides of the sleeves together.  Then I sewed the sides of the tunic together.  At the top of the tunic, I made a casing for narrow elastic (1/4") around the entire neck area, added elastic, and sewed the casing closed.  Then I tried the tunic on the doll to determine how long I wanted the tunic, took the tunic off, and hemmed the bottom.

How's that for a non-tutorial?  If you know of a better tutorial, please leave a comment and let us all know where to find it!  As always, if you make anything with one of my (non)tutorials, feel free to ask questions or give suggestions.  I'd love to see your finished work!  Good luck!

Tuesday, February 15, 2011

Photography Tips for Newbies?

Look what Cupid-hubby brought me!  He started planning weeks ago, getting advice from our talented photographer friend Bekah.  Though I have the camera pictured above, I have two different lenses.  Neither of which I know how to use - really use - yet.

Anyone have tips for me? Websites on photography for beginners? I have no idea where to get started. Heck, I don't even know what the little f means.  For now, thank Heaven for auto settings!

Today I played with my telephoto lens (the long range one).  Lincoln and I had a wonderful five-minute photo session until he had to go potty.

Not bad for five minutes on Day 1, eh?  It helps that I have a stinkin' cute subject.


Monday, February 14, 2011

Happy Valentine's Day!


Hope your Valentine's Day is filled with all things heart-shaped...


made with, by, or for the ones you love.


And if there's a chocolate version...


all the better!


XOXO,
Rachel

Thursday, February 10, 2011

Waldorf Doll


Yes, you may clap now. This was completely out of my league! But it's done. DONE! And looks pretty darn cute, if I do say so myself.


When I got here, I cheered. Evenly stuffed legs. Feet. A head that doesn't wobble. Miracle after miracle. I could see the end in sight.


When I got here, I cheered some more. A face...hair...I'm finished! Then I took another look...the doll is naked. Oops, still not done.

I searched and searched online for free patterns for doll clothes. 15-inch, Waldorf doll, Bitty Baby. Nothing. NOTHING. Now, I know some talented mommy-blogger has posted something, but darned if I could find it. So I made my own doll clothes - are you ready to be impressed - without a pattern!


(in your best fashion runway voice) This 15-inch Waldorf doll is modeling a Rachel original: knee-length tunic with contrasting short sleeves and matching leggings. Fabric from the Amy Butler Midwest Modern collection.

I don't know that I ended up with enough pictures to make a full tutorial of the outfit, but I'll try to post general instructions.

Monday, February 7, 2011

In the Works (and kicking my boo-tay)


Anyone ever made a Waldorf doll? Ay yi yi. I was supposed to give this to my niece for Christmas. I keep dragging it out, then putting it away because it scares me. Shape a head? Roll wool into a firm, even ball? Even worse, roll TWO wads of wool into firm, EVEN balls. What...babies can't have one chubby leg and one skinny one?

This is NOT a project for beginners. I had help with the head form. The same helpful friend made the wig caps for me (WAY out of my league). You'll see two wigs on the table. My friend wasn't sure which shade of blonde I'd like, so she let me bring home two colors to audition. Now I'm attaching feet to legs, stuffing arms, mustering the courage to attach the head, and debating what type of clothing and hairstyle to give this plush little girl.

If you look at the right side of the photo, you'll see my husband's hammer and work gloves...


He has a laundry list of projects, too. First, prepping the nursery for our baby. We moved my younger son out of his bedroom and into his big brother's room. Making two rooms' worth of stuff fit into one room was challenge enough! Now for the decorating...Here you can see my husband's priming the walls for a fresh coat of paint.


And what will that fresh coat of paint look like? I'm thinking of a pale aqua. Behold the fabric for Baby Girl's nursery set. When I finish the crib set (you caught that this is another project in the works, right?), it will mostly be red and aqua, with splashes of pink and brown. The red, pink, and aqua fabrics are all from the Bliss collection by Moda.


Lastly, when renovating a bedroom and prepping for a baby, it also sounds like a good idea to install hardwood floors and refurnish a dining room and a living room, right? I know, we're nuts. You can see my husband's already removed the molding and floorboards. Our new Brazilian cherry planks are sittin' happy while they adjust to the temperature and humidity. It takes a week for the wood to acclimate to a new building. Since we're redecorating my younger son's room into a nursery, you can also see piles of his old stuff waiting to be sold on Craigslist.

Does anyone else go nuts when their house is torn apart? I want it DONE! Sorry, this turned out more angst-y than I intended. I can take out my frustration by stuffing the firm parts of the doll. Stuff, stuff, smoosh, smoosh, SMASH.